
No Christmas is complete without cookies and candy canes. These crisp, buttery Peppermint Candy Cane Shortbread Cookies combine both of those in one delicious mouthful!

About the Candy Cane Shortbread Cookies
Candy canes are an essential part of every Christmas scene. With their classic red and white stripes and sweet peppermint flavor, they add to any treat box or festive Christmas tree.
Any Christmas at our houses aren’t complete without lots of cookie baking, and these peppermint candy cane shortbread cookies check all of the boxes. They are crisp and buttery, just like a good shortbread cookie should be. Festive red and white stripes make them look as tantalizing as they taste, with the perfect amount of pepperminty flavor!


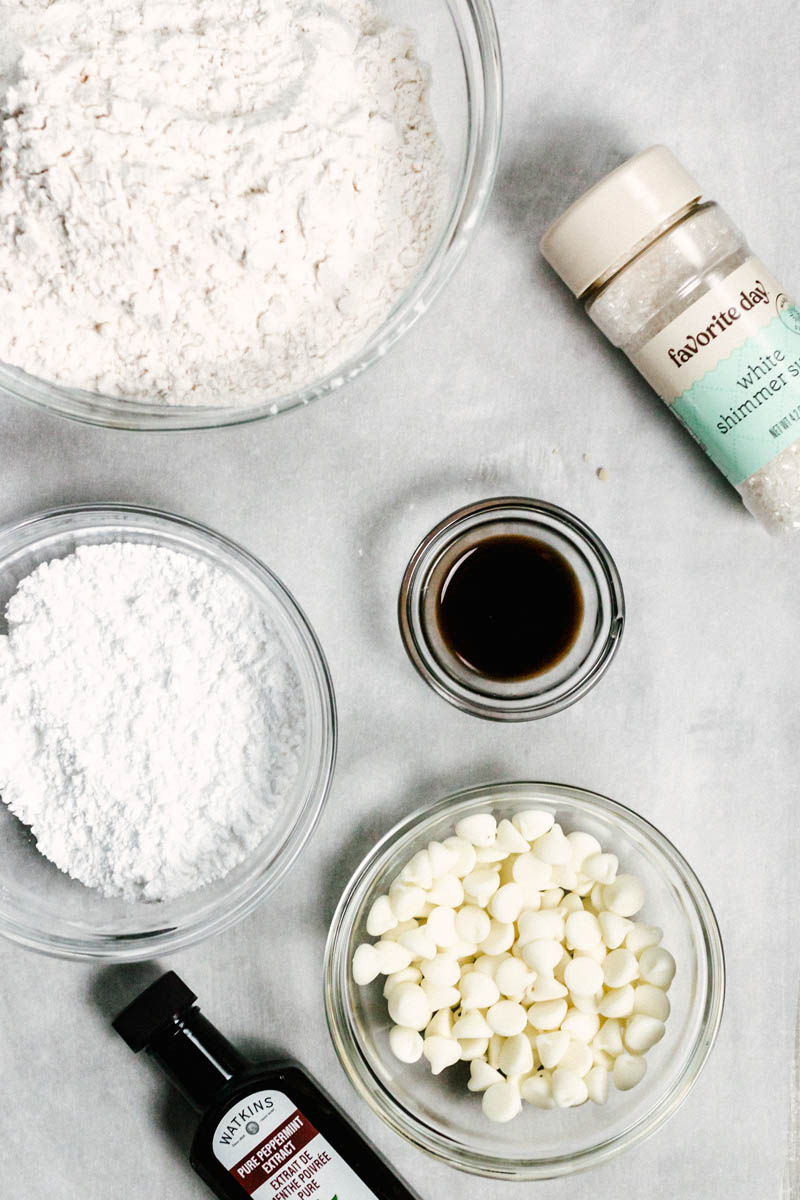
Peppermint Candy Cane Shortbread Ingredients
- Peppermint Extract – I used Watkins, and I prefer their flavor over some other brands. But feel free to try to use what you like best!
- Vanilla – I use Mexican vanilla. It is my FAVORITE vanilla out there!
- Salted Butter – We use salted butter almost always. Salt is what makes a good cookie into a WOW cookie. This is the only source of salt in these cookies, so use salted butter with this recipe.
- White Chocolate Chips – I use whatever white chocolate chips I have on hand and they work great. This adds a sweet flavor and helps make a smooth, crisp shortbread.
- Red Food Coloring – I use gel food coloring always. It doesn’t mess with the consistency of anything. We’ve tested this recipe with liquid food coloring, too, and both work great!
- Powdered Sugar – helps create the smooth crumb essential to a shortbread cookie.
- Flour – use all-purpose flour for the perfect texture.
- White Sparkling Sugar – adds beautiful sparkle and crunch to these cookies!

How to Make Peppermint Candy Cane Shortbread Cookies
- Preheat the oven to 325˚F. Line a baking sheet with parchment paper.
- In a mixing bowl, beat the butter for about 3-5 minutes, until very light and fluffy.
- Melt the white chocolate chips carefully in the microwave. Stir them about every 30 seconds until smooth.
- Pour the melted white chocolate chips into the butter and mix quickly to combine. Scrape the bowl and add vanilla and peppermint extract, and mix.
- Add the powdered sugar, and beat for about 2 minutes.
- Add the flour and mix, scraping bowl as necessary.
- Once combined, split the dough in half, placing them in two separate bowls. I weighed the dough and it was about 10 oz of dough in each bowl.
- In one of the bowls, mix in red food coloring, until fully combined.
- Transfer the dough into piping bags (or gallon ziplock bags), one for each color of dough.
- Cut the tip so you have about 1/2 to 3/4 inch width of dough being pushed out.
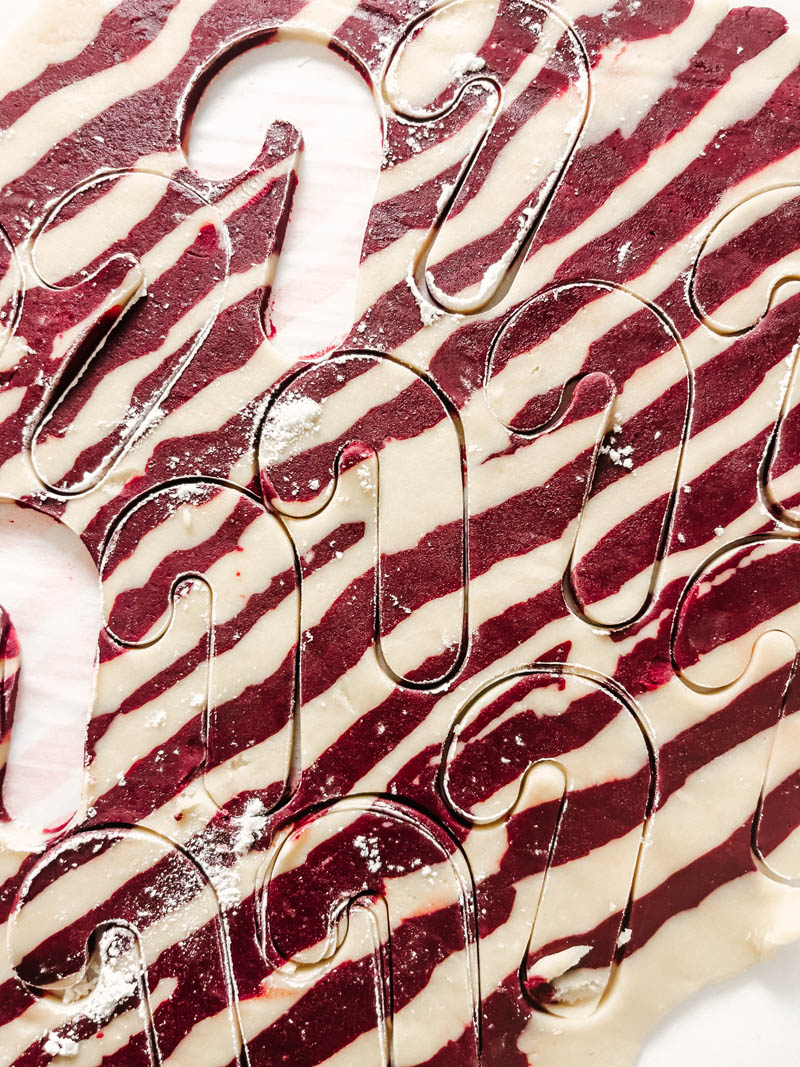
- On parchment paper, pipe the dough diagonally, switching between the red and plain dough to make stripes.
- Carefully top the dough with parchment paper and roll out the dough to smooth and combine.
- Chill the dough until cold, either in the fridge or freezer. It chills pretty quickly.
- Using a candy cane cookie cutter, dip in flour and cut out cookie shapes. Repeat.
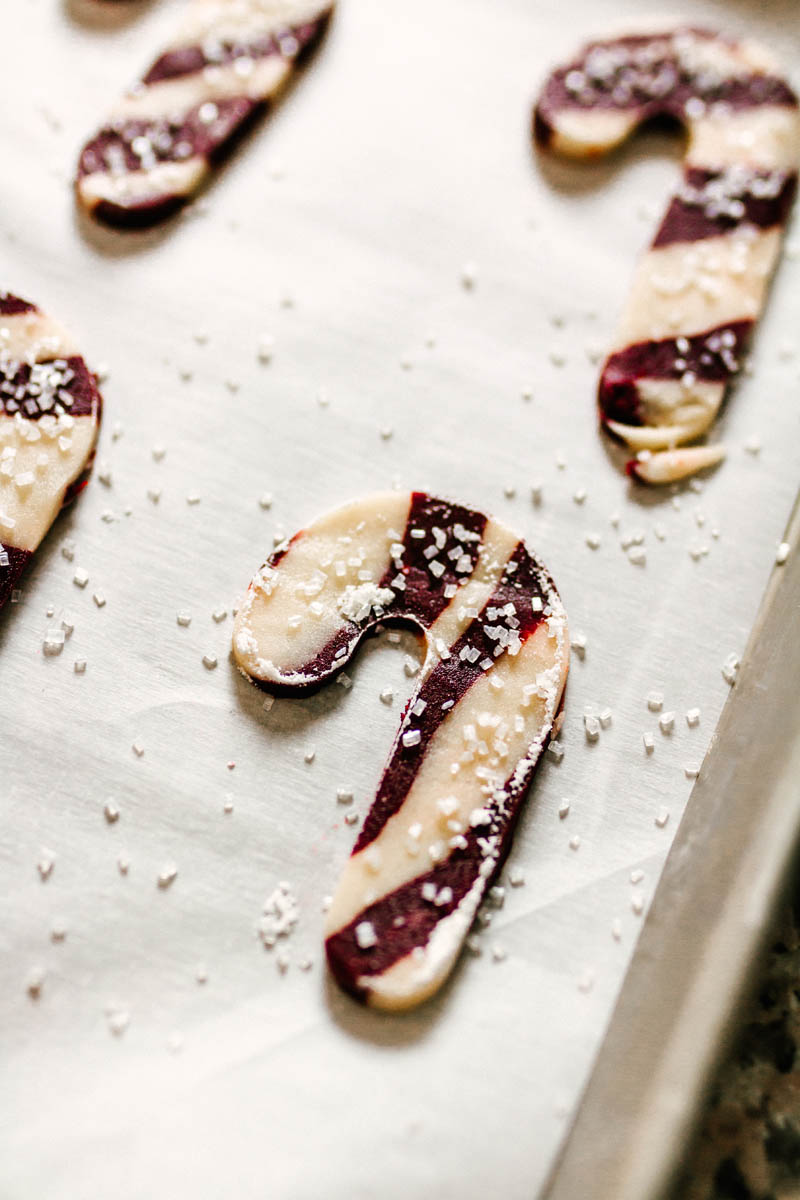
- Carefully push the dough out of the cutter onto the baking sheet.
- Sprinkle each candy cane with sparkling sugar.
- Bake for 12 to 15 minutes. The cookies will be done when they start to lightly brown. Let cool and enjoy!


We hope you enjoy these peppermint candy cane shortbread cookies! They are so refreshing and a fun addition to any Christmas cookie box!
Looking for more delicious Christmas recipes? Try these:
- Snowball Cookies
- Chocolate Crackle Cookies
- Chocolate Mint Delight Cookies
- M&M Christmas Pudding Cookies
- Gingersnap Cookies

Peppermint Candy Cane Shortbread Cookies
No Christmas is complete without cookies and candy canes. These crisp, buttery Peppermint Candy Cane Shortbread Cookies combine both of those in one delicious mouthful!
Ingredients
- 1 C (8 oz) salted butter, room temperature
- 1/3 C (2 oz) white chocolate chips, melted
- 1 tsp vanilla
- 2 tsp peppermint extract
- 1/3 C (1.5 oz) powdered sugar
- 2 C + 2 T (9.6 oz) all-purpose flour
- 1 T red gel color
- 4 T white sparkling sugar
Instructions
- Preheat the oven to 325˚F. Line a baking sheet with parchment paper.
- In a mixing bowl, beat the butter for 3-5 minutes until light and fluffy.
- Melt the white chocolate chips carefully in the microwave. Stir ever 30 seconds until smooth.
- Pour melted white chocolate chips into the butter and mix quickly to combine. Scrape the bowl and add vanilla and the peppermint extract. Mix.
- Add powdered sugar. Beat for 2 minutes.
- Add flour and mix, scraping bowl as necessary.
- Once combined, split the dough in half, placing in two separate bowls. For us, this was about 10 oz of dough.
- In one of the bowls, mix in the tablespoon of red gel coloring, until fully combined.
- In 2 piping bags (or gallon sized Ziploc bags if no piping bags) push in the colored and non colored dough, separately.
- Cut the tip so you have about 1/2 to 3/4 inch width of dough being pushed out.
- On parchment paper, pipe the dough diagonally switching between the red and the plain dough to make stripes.
- Carefully top with parchment and roll out the dough after piping to combine.
- Chill the dough until cold, either in the fridge or freezer. It chills pretty quickly.
- Put some flour on a plate, about 1/2 cup. With a candy cake cookie cutter, dip it in the flour between each cut.
- Carefully push the dough out of the cutter onto the baking sheet.
- Sprinkle each candy cane with sparkling sugar.
- Bake for 12-15 minutes. They will be done when they start to lightly brown.
- Let cool.
Notes
- You will need either piping bags or gallon sized Ziploc bags.
- If you have clear vanilla, use it. Helps the un-dyed dough stay a little bit whiter.


0 Comments